

I’ll admit it, I bribed my neighbours with oliebollen to get away with noise complaints!
I used to host house parties often back in the day, and one of them was, of course, a New Year’s Eve party. New Year’s Eve was loud, music a little too high, we laughed, we danced like crazy with that familiar feeling of, “Oh no… someone is definitely going to complain,” especially since both of my downstairs neighbours have young children. So, to prevent noise complaints, I did what any food lover would do: I fried a batch of oliebollen and sent them downstairs.
And honestly?
It worked.

For anyone who doesn’t know, oliebollen are a traditional Dutch doughnut, eaten all over the Netherlands from autumn onwards, but especially around Christmas and New Year’s. Golden, puffy, and comforting, the kind of food that feels like a warm hug. Crispy on the outside, soft on the inside, and absolutely perfect for sharing when you need a little forgiveness.
I usually love them the classic way, but sometimes I like to bend tradition just a bit. This time, I added chunks of apple and a touch of cinnamon. Not exactly how the Dutch grandmothers would do it, but trust me, it’s sooo good! The apple keeps the inside tender and juicy, and the cinnamon gives it that cozy, festive warmth that feels like the holidays in one bite.
I always use a trigger-release ice cream scoop to drop the dough into the oil. It keeps the oliebollen rounder and somehow makes the whole process feel calmer. One scoop at a time, watching them puff up and turn golden, filling the kitchen with that delicious smell.
The very first time I learned how to make them was about 14 years ago, when my ex Dutch mother-in-law came to visit me in Indonesia during Christmas and New Year’s. We spent our days in the kitchen, making oliebollen and apple pie together. I remember she used Guinness beer to replaced the yeast. Very interesting!
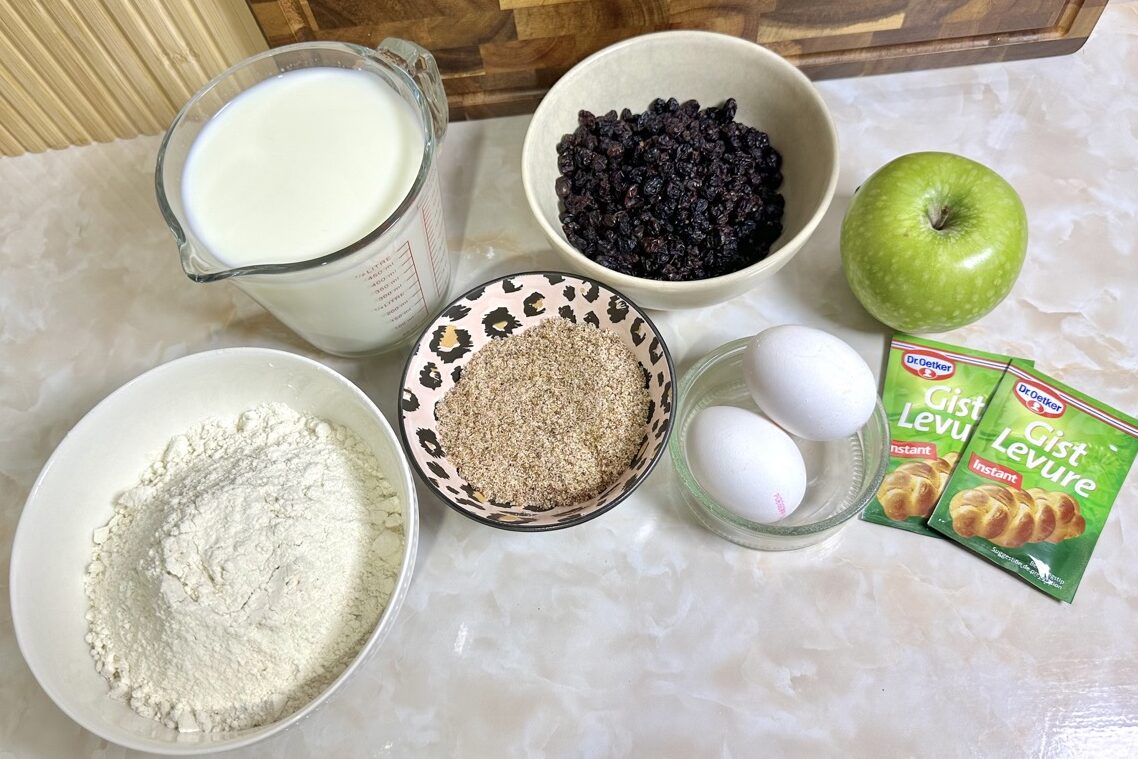
Oliebollen Ingredients:
Oliebollen may look simple, but each ingredient plays an important role in creating that fluffy, golden Dutch treat. Here’s what you’ll need—and what each item brings to the dough.
All-Purpose Flour: Flour forms the base of the batter and gives oliebollen their structure. All-purpose flour is ideal because it creates a light but sturdy texture that can hold air bubbles while frying.
Milk: Milk adds moisture and richness to the dough. Using lukewarm milk helps activate the yeast, giving the oliebollen their signature airy inside.
Yeast: Yeast is the key to soft, fluffy oliebollen. As it ferments, it produces gas that makes the dough rise, resulting in a light and slightly chewy texture instead of a dense fritter.
Eggs: Eggs enrich the batter, adding flavour and contributing to a tender interior. They also help bind the ingredients together.
Raisins or Currants: Traditionally, oliebollen include raisins or currants for bursts of sweetness in every bite. They also add texture and contrast to the soft dough.
Apple: Small diced apples are a popular variation, adding freshness and a slight tartness that pairs perfectly with the fried dough.
Salt: Salt balances the sweetness and enhances the overall flavor. It also helps control yeast activity so the dough rises evenly.
Sugar: A small amount of sugar feeds the yeast and adds a gentle sweetness. It also helps the oliebollen brown beautifully while frying.
Oil (for Frying): A neutral oil like sunflower or vegetable oil is best for frying. It allows the oliebollen to cook evenly and develop a crisp, golden exterior without overpowering the flavour.
Powdered Sugar (for Serving): Not mixed into the dough, but essential for finishing. A generous dusting of powdered sugar is the classic final touch that makes oliebollen instantly recognizable.
How to Store and Reheat Oliebollen
Fresh oliebollen are always best, but the good news is that you can easily keep and reheat them without losing too much of their magic. Here’s how to do it properly.
At Room Temperature (Short Term)
If you plan to eat them within 24 hours, store oliebollen at room temperature. Let them cool completely first, then place them in a paper bag or loosely covered container. This prevents moisture buildup, which can make them soggy. I keep them either in my bread container or in the oven (when it’s off of course).
In the Freezer (Best Option)
Freezing is the best way to keep oliebollen fresh for longer.
- Let them cool completely
- Wrap each oliebol individually in plastic wrap or place them in a freezer-safe bag
- Store in the freezer for up to 2 months
Freezing helps preserve both flavor and texture, especially if you plan to reheat them later.
How to Reheat Oliebollen
In the Oven (Best Method)
This is the most reliable way to bring oliebollen back to life.
- Preheat the oven to 180°C
- Place oliebollen directly on the oven rack or on a baking tray
- Heat for 8–10 minutes (frozen oliebollen may take 12–15 minutes)
They’ll come out warm, fluffy inside, and slightly crisp on the outside.
In an Air Fryer
A quick and effective option if you have one.
- Heat at 180°C for 3–5 minutes
- Check frequently to avoid over-drying
Final Tip
Always dust oliebollen with powdered sugar after reheating, not before storing. This keeps them from becoming sticky and ensures that classic snowy finish.
Now you know how to make oliebollen, so let me ask you:
How do you get away with noise complaints?
Apologies? Turning the music down? Or maybe… just maybe, a plate of something delicious?
Because if there’s one thing I’ve learned, it’s this:
Sometimes, oliebollen really can save the night. 😉

Oliebollen with Apple and Cinnamon
Equipment
- 2 Large mixing bowl
- 1 Whisker
- 1 Spatula
- 1 Knife
- 1 Small bowl
- 1 Frying pan
- 1 Frying rack
- 1 Trigger-released ice cream scoop
Ingredients
- 500 gr All purpose flour
- 400 ml Luke warm milk
- 14 gr Instant yeast
- 1 pcs Granny smith apple. Cut into small cubes
- 200 gr Raisins. Soak briefly in warm water to hydrate
- 60 gr Light brown sugar
- 1 tsp Cinnamon powder
- Pinch of salt
- 1 Liter Oil. To fry
- Powdered sugar. To dust
Instructions
- In a large bowl, mix in milk and yeast. Stir until well-combined.
- In another large bowl, add in flour, sugar, salt, and cinnamon. Stir until combined.
- Create a well in the middle of the flour mixture, and pour in the milk-yeast mixture. Lightly whisk together until well-combined.
- Add in the cut apple and raisins into the batter, and fold in with a spatula until well-combined.
- Cover the batter with a napkin and place it in a warm room to proof for about 1 hour until the batter double in size.
- After one hour, take out the napkin, and fold the proofed batter with a spatula until well-combined. Dig to the bottom, because the raisins and apple are usually sink down in the bottom during proofing. After that, cover the batter with the napkin again and let it rest for another 3 minutes.
- While waiting for the batter to rest, heat up the oil in a frying pan in a medium heat. Once it's hot, take out the batter and fold again with a spatula until everything is well mixed.
- Scoop in the batter with a trigger-release ice cream scoop to keep it rounder. Fry to about 6 minutes until golden brown. Drain the excess oil on paper towels and serve with powdered sugar. Enjoy! 🙂
Leave a Reply